The fairing and sanding continues. Greg read about a really neat idea that will likely save us countless hours of eyeballing, and in the end, provide us with a significantly more accurate finished product...
In my last entry, you saw the level that showed approximately how much filling we need to do. Well, Greg decided to wrap that level in plastic, run a strip of filler under where the level was, and then essentially mash the level into the filler and let things dry. After the filler dried, he removed the level, shaved down the excess epoxy and voila, he had a "rail" that gave us a guide for how much filler we need to use. By running a second "rail" down the center, and a third one down the other side, we had a rail system built, which will allow us to roll out a single, thick, accurate layer of filler and dramatically reduce the amount of sanding and fairing we will need to do. A stroke of genius!
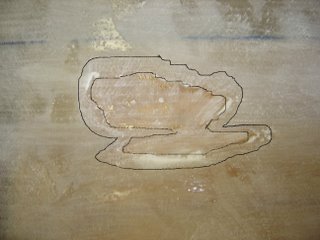 On the downside, when sanding yesterday, we came across a big spot that was starved for epoxy, as shown (and outlined) in the picture to the right. This is an area thats come back to haunt us from way-back-when. The area is approximately 4"X3." Its nothing that cant be overcome, but is a little frustrating.
We have yet to decide how to address the issue, but Greg has two ideas... one is to use fiberglass filler and epoxy, the other is to use glass micro-filler and epoxy. Ive found one or two other spots like this, but theyre small, in non-structural areas, and easy to fix.
 Heres another small stroke of genius Greg ran across...
-Are you tired of constantly stirring epoxy and/or thickener?
-Are you working by yourself and would like to save a little time?
-Are you working with fast hardener, and tired of worrying if its going to kick too quickly?
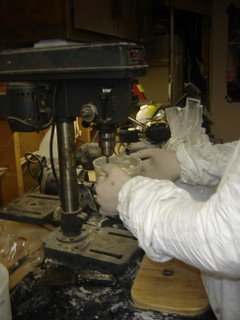
If any of these problems apply to you, then you should try what Gregs doing in this picture to the right. Use a drill (or drill press) and a paint-stirring bit to do the work for you. Its quicker and easier. Just remember to take measures to protect your drill. It would really suck if you ended ruining your drill because it got all gummed up with epoxy.
Read More..
In my last entry, you saw the level that showed approximately how much filling we need to do. Well, Greg decided to wrap that level in plastic, run a strip of filler under where the level was, and then essentially mash the level into the filler and let things dry. After the filler dried, he removed the level, shaved down the excess epoxy and voila, he had a "rail" that gave us a guide for how much filler we need to use. By running a second "rail" down the center, and a third one down the other side, we had a rail system built, which will allow us to roll out a single, thick, accurate layer of filler and dramatically reduce the amount of sanding and fairing we will need to do. A stroke of genius!
 On the downside, when sanding yesterday, we came across a big spot that was starved for epoxy, as shown (and outlined) in the picture to the right. This is an area thats come back to haunt us from way-back-when. The area is approximately 4"X3." Its nothing that cant be overcome, but is a little frustrating.
We have yet to decide how to address the issue, but Greg has two ideas... one is to use fiberglass filler and epoxy, the other is to use glass micro-filler and epoxy. Ive found one or two other spots like this, but theyre small, in non-structural areas, and easy to fix.
 Heres another small stroke of genius Greg ran across...
-Are you tired of constantly stirring epoxy and/or thickener?
-Are you working by yourself and would like to save a little time?
-Are you working with fast hardener, and tired of worrying if its going to kick too quickly?
If any of these problems apply to you, then you should try what Gregs doing in this picture to the right. Use a drill (or drill press) and a paint-stirring bit to do the work for you. Its quicker and easier. Just remember to take measures to protect your drill. It would really suck if you ended ruining your drill because it got all gummed up with epoxy.


