Tampilkan postingan dengan label the. Tampilkan semua postingan

Jumat, 27 Januari 2017

Construction of the Northeaster Dory Begins

January 9th and 16th, marked the start of construction for this years boat: Chesapeake Light Crafts Northeaster Dory. The complexity of this boat is much greater than last years 2 Peace Canoes, but under the direction of George Smith and armed with great participants and volunteers, all are ready to meet the challenge of this boat. First, we must give thanks to John Harris over at Chesapeake Light Craft for donating the kit, as he truly believes in this project. We have about 1/3 of builders returning from last year as well as a majority of returning volunteers. Joining our volunteers are a number of new, energetic individuals ready to offer assistance and mentoring to our participants.
Both the 1st timers and veteran boat builders, as well as, the volunteers had many interesting things to say as they set foot into the Barge House for the first time this January.


Mr. Joe and Samantha work on tightening
the copper wires.

Nayya: I am interested in building a boat, because I have never done it before. I am looking forward to the new experience. I want to keep using the saw, because it is fun.

Tasia: This is much harder than I expected. It is difficult to thread the wires through the holes for stitching.

Maurice: This year is definitely going to be different, because we did not have to do any stitching last year. Judging by the picture of the boat the dory is going to look "TIGHT!" It is going to be another fun year, the stitching hurts your fingers, but "no pain, no gain."

Peco: Being involved again this year, with a fun project, is much better than sitting at home.

MJ: I had fun the first time, I liked painting the best, so I look forward to when we get to paint again. (Brother) Perry agreed it was a fun project, I just think it is fun to build a boat and I look forward to getting to row this one.

Crystal: I think building boats is interesting. I had fun building the Peace Canoe and I was so glad that it did not sink.

Enner: Call me the "Re-Enforcer" I like making sure everything is done right.

Samantha: I like working together and think everyone involved is nice, that is why I came to experience what it is like to build a boat.


Tavon works with the Japanese saw.

When speaking with the volunteers the joy of working with the kids was the number one reason they came back or got involved with the project for the firs time this year. They were also excited to learn along side the kids a new skill. Being in the Barge House, a closer setting, makes for it easier to focus and get to know the participants better.


Read More..

Rabu, 25 Januari 2017

Laser Leveling the Rear Transom


Laser Leveling the Rear Transom
Originally uploaded by OzzyC.
In preparation of mounting the front transom, we used a laser level to make sure the rear transom was mounted correctly. The mounting of the front transom started immediately following this verification.
Read More..

Jumat, 20 Januari 2017

resurrecting the oars

The old pair of 30 year old Sitka spruce oars was really beat up and the leathers are in the wrong spot to protect them from the effects of a lot of rowing.  So, it was time to strip them, back to bare wood or replace them.  I got several quotes for replacement and it was going to run upwards of $200 to replace them.  Therefore, there was no other option. 

I had to fix the crack in one blade so I applied a layer of glass to each blade on both sides to prevent water penetration and add strenght to this much abused section of the oars.  Then went about trying to remove the old oar leathers.  These were 1/4" pieces of rawhide that were apparently epoxied in place, and at some point appeared to have served as a dog chew toy.  Getting them off was an incredible challenge.  I tried cutting them off resulting in poking a hole in my wrist with the filet knife.  Then tried sanding them off with the orbital sander and wound up burning a hole in the pad.  (Will contact Craftsman for a replacement)  No avail.  Next I tried filing them off with rasps.  Still no progress.  then in the process of applying the 6" disc grinder to them, of which I tore the sheet right off the grinder, I noticed the secret.  HEAT! 

I ran to the basement to retrieve the heat gun out of dormancy, and going back to the filet knife once again was able to get these suckers off with a little elbow grease and time (15 minutes).  Then a final sanding. 

The oars were then hung by the handles and thoroughly saturated with varnish.  they will get sanded tomorrow and then a second coating of varnigh to be followed by new leathers being sewed on. 

Finding suitable leather was a challenge as well and I finally found some at my local fabric shop that caters to people who really sew things up from scratch.  they actually had full cowhide pieces as well. 

This was a nice way to spend a hot, and humid day in the Northeast US where it was 100 degrees today.  Too damned hot to go out in the boat.  I still am not sure I saved any money as I now need to get a new pad for the sander and replace a lot of torn up sandpaper.  Hopefully, someone will benefit from this experience other than myself.

Read More..

Kamis, 19 Januari 2017

Another day of work


Stringers - Final Gluing
Originally uploaded by OzzyC.

Yesterday we did the final gluing of the stringers, and so far this is the part that Im most concerned about. We butt-joined the wider piece on the left to the narrow piece on the right. The now-joined stringer runs from the bow transom to the stern transom, and form the entire bow-to-stern frame pieces.

My concern is that that well break this specific joint in the period between when the joint dries and when we actually mount the pieces. Id highly recommend using a two-person moving method with these completed pieces. Set the stringers vertical (so theyre facing the way they will face when finally installed). Have one person lift with one hand on either side of the joint in this picture, and one person lift toward the back of the narrow section. I may do another video on this to more efficiently demonstrate what Im talking about.

But Im digressing...
Lets assume this joint is as strong as Id hope it should be... lets concentrate on what we did to set this butt joint... As usual, saturate all of the surfaces to be joined with unthickened epoxy, and saturate the fiberglass tape. Lay a coat of thickened epoxy on butt joints. Lay the plastic on the floor. Lay the bottom piece of fiberglass tape roughly where you want it. Set the boards on top of the bottom piece of fiberglass tape, and preset the butt joint. Lay the top piece of fiberglass tape on top of the plywood butt joint. Lay a piece of plastic on top of all of this. Use a square to get a precise 90 degree angle, as the picture hints at. Then use a piece of scrap wood, and temporarily screw the scrap wood to both sides of the butt joint. This will help keep the butt joint from floating during the curing process.

Remember, if you click on the picture, you can see the picture complete with comments and tags on the pics that can help you visualize what Im discussing. Again, the picture is courtesy of www.flickr.com

Read More..

Rabu, 18 Januari 2017

day 2 fishing 2011

Not quite so windy only blowing to 20 kts.  The electric sat side by side with the 9.9 as there is plenty of room for both on the transom.  The boat handles great, and is incredibly stable to fish from.  No fish...but there is always tomorrow. 

I am now looking at laying out some simple tie downs for things inboard such as fenders and such.  Might make a few wood loops/handles and bolt them on.  they would look good and function well.  Another thought is a few eyelets bolted under the handrail.  A rod hold is a must at this point.  Will look for some suitable holders.

David
Read More..

Selasa, 10 Januari 2017

The Good and the Bad and the Good

The fairing and sanding continues. Greg read about a really neat idea that will likely save us countless hours of eyeballing, and in the end, provide us with a significantly more accurate finished product...

In my last entry, you saw the level that showed approximately how much filling we need to do. Well, Greg decided to wrap that level in plastic, run a strip of filler under where the level was, and then essentially mash the level into the filler and let things dry. After the filler dried, he removed the level, shaved down the excess epoxy and voila, he had a "rail" that gave us a guide for how much filler we need to use. By running a second "rail" down the center, and a third one down the other side, we had a rail system built, which will allow us to roll out a single, thick, accurate layer of filler and dramatically reduce the amount of sanding and fairing we will need to do. A stroke of genius!


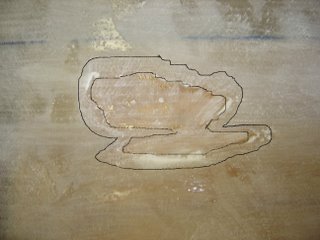
On the downside, when sanding yesterday, we came across a big spot that was starved for epoxy, as shown (and outlined) in the picture to the right. This is an area thats come back to haunt us from way-back-when. The area is approximately 4"X3." Its nothing that cant be overcome, but is a little frustrating.

We have yet to decide how to address the issue, but Greg has two ideas... one is to use fiberglass filler and epoxy, the other is to use glass micro-filler and epoxy. Ive found one or two other spots like this, but theyre small, in non-structural areas, and easy to fix.


Heres another small stroke of genius Greg ran across...

-Are you tired of constantly stirring epoxy and/or thickener?

-Are you working by yourself and would like to save a little time?

-Are you working with fast hardener, and tired of worrying if its going to kick too quickly?

If any of these problems apply to you, then you should try what Gregs doing in this picture to the right. Use a drill (or drill press) and a paint-stirring bit to do the work for you. Its quicker and easier. Just remember to take measures to protect your drill. It would really suck if you ended ruining your drill because it got all gummed up with epoxy.
Read More..

Rabu, 04 Januari 2017

Prepped Hull


Glassing the Hull 010
Originally uploaded by OzzyC.
The hull is now prepped. A base coat of epoxy has been applied to the entire exterior of the hull. Isnt it shiny?
Read More..

Minggu, 25 Desember 2016

BoatBuilding Cutting the Frames


BoatBuilding - Cutting the Frames
Originally uploaded by OzzyC.
Over the last couple of weeks, weve been constructing temporary frame pieces, which were cutting out of particle board. The reason were doing this, and the process behind what were doing will take a little bit of explaination, so be prepared for a long entry.

The reason were cutting these temporary frame pieces is so that were sure the hull is straight. If you look at the picture, you may notice two pieces of board... one smaller piece of board, sitting on top of the particle board. The smaller piece is the actual frame piece that will be in the boat when its put on the water. The hull goes much farther up than this though, so we are using temporary pieces during the hull setting process. Once the hull is set, we will remove the temporary pieces and install the permanent pieces, so that we can add the deck.

In order to cut these sacrificial particle board frame pieces, we started with a 4x8 piece of particle board. We set the actual frame piece on the particle board and clamped it in place. We then determined the center point and line of the actual frame piece and extended this center line through the particle board, so that we could measure needed dimensions. After measuring the center line, we extended the end-lines of the permanent frame piece up the particle board, and measured from the center line to the top corners. In order to make sure our cuts were true, we measured cross-angle. we then added the notches and cut it all out with a power saw, except for the notches, where we used a jigsaw.

Click here to see the video summary of what we did.
Read More..

Kamis, 22 Desember 2016

The Kit Isnt Perfect


ShavedTransom
Originally uploaded by OzzyC.
In this photo, Im holding the piece we cut from the rear transom. We cut this piece from both ends, so the kit cut the rear transom about 1" large on both ends.
Read More..

Selasa, 13 Desember 2016

Make Sure to Use Plenty of Epoxy


CrappyGluing
Originally uploaded by OzzyC.
After we cut the excess length off of the rear transom, we decided to test the strength of the epoxy. I figured a drop test would be the best way to get a guage of how strong our gluing job was, and I was concerned with the results.

I dropped the excess from about five feet, to see how well it would hold up to a shock. The results werent good. One of the four layers completely broke away. The second layer, as shown in this picture, split about 2/3 of the way through.

The moral of the story?? Use more glue than we did. In order to compensate for the lack of glue, we are going to reinforce the rear transom with several bronze screws. Were going to use bronze screws because they wont corrode over time.
Read More..

Kamis, 08 Desember 2016

Another Shot of the Hull


Hull2
Originally uploaded by OzzyC.
In this picture, weve still got weights on the front end, because we havent filleted the inside transom joints with thickened epoxy yet.
Read More..

Jumat, 02 Desember 2016

A Good Days Work

As Ive mentioned time and time again, summer seems to slow Greg and me down on our quest for the perfect cabin cruiser. Today however, we made some great progress. We sanded down the hard chine on the port side and began the fine work with quick fair. It wasnt a long session time-wise, but we accomplished a lot. Additionally, we discussed ways to work smarter. The problem weve been running in to lately is that we can only put in an hour or two of work and then are required to wait for things to cure. Since the starboard side is about ready for flowcoating and priming, I brought up the idea of flowcoating and priming the boat in sections. This way, if there are areas that we need to revisit, we can be more effective in our work. Your thoughts??
Read More..

Kamis, 01 Desember 2016

Take your time when you lay the tape


Reinforced Stringers 1
Originally uploaded by OzzyC.
Its best to take your time when you set the fiberglass tape on the joints. If you fail to adequately saturate the tape with epoxy, or if you fail to adequately set the tape onto the wood, the tape wont bond well to the wood, as shown in this picture.

Its really not a big deal to correct this problem; all we had to do was cut away the tape that didnt bond to the wood, feather the edges and lay down another piece of saturated tape... but it would have been nice to have gotten it right the first time.
Read More..

Sabtu, 26 November 2016

Flaw in the Rubrail


Flaw in the Rubrail
Originally uploaded by OzzyC.
In a continuation of "back to basics" week, I will discuss this rubrail in a bit more detail.

We purchased 10-foot sections of oak, which is obviously too short for the entire canoe. We compensated for this by angle-cutting the oak sections and joining them together with epoxy. We did the joints at port-bow and starboard-stern, for load balancing. This way if we hit something that would break one joint, they both wouldnt break.

This spring, my boat hit a rock in rapids, and popped the rubrail joint. I tried patching the popped joint with gorilla glue, but that was inadequate for the job, and the joint popped again, (on a much smaller rock, at a much lower speed.)

As you can imagine, I was starting to get a little frustrated over my canoe continually "breaking." I figured it was time to do the job right, so I decided to sand and re-epoxy the joint from scratch.

Unfortunately, my daughter wanted to help, and due to a perfect storm of circumstances, I didnt quite mix the epoxy right, and it never quite set. Growing even more weary of this ongoing problem, I sunk a couple of bronze nails into the seams, figuring that would do it. Thats when I sanded and painted the boat, and when I noticed the flaw in this picture. If you look VERY closely (not the best picture), you can see that theres no epoxy bonding the rubrail to the hull. Once the paint dries, but before I stain the rubrails, I will bond the rubrail to the hull with a thin line of unthickened epoxy.
Read More..

Jumat, 25 November 2016

Heres a Pic of what We Cut from the Bottom


More Shavings
Originally uploaded by OzzyC.

Read More..

Kamis, 24 November 2016

Mounting Frame Pieces


Mounting Frame Pieces
Originally uploaded by OzzyC.
Weve begun to mount the horizontal (port-to-starboard) frame pieces. There are six in all, and yesterday we mounted three.

We started by temporarily removing the stringers. This was Gregs idea, and I saw no need to keep them mounted, so they were pulled down. Next we measured the distances for all of the frame pieces, relative to the rear transom, and marked these distances on the building frame.

Next, we used the laser level to find the horizontal mounting point. We lined up the laser level with the reference point on the rear transom that we created a few weeks back. Next, we ran a piece of string down the bow-to-stern center line. This way we have the horizontal and vertical points of reference on each frame piece accurately measured. (You may remember that we drew these reference points on the frame pieces when we constructed them.)

Next we screwed 2x4 jigs into the building frame, in preparation for mounting the frame pieces to these same 2x4 jigs.

Next, we set the frame pieces on a floor jack, and lifted the jack to the correct height and center. This allowed us to make fine adjustments and get the frame pieces accurately placed. Once we lined up the horizontal points of reference with the laser level, and the vertical point of reference with the string, we screwed the frame pieces to the 2x4 jigs. This process went very quickly.

NOTE: Once we got the second frame piece mounted, we reset the stringers in place, knowing that it would be difficult to place them later.


Click here to see the video summary of what we did.

Read More..

Minggu, 20 November 2016

Got the Pic

I finally got around to snapping an updated picture of the boat. The color you see is tinted epoxy, not a finished paint job, but hey its progress. Either way this shot should give you an idea of what weve done since my last post with a photograph. The shape is a little more refined, and the spray rails are much more polished.

I still cant wait to get this thing flipped, but the picture helps me visualize the progress weve made over the last couple of months.

To put things in a little more perspective, Ive been looking at other builders boats. Today I did a check-in on Andrew Luckings boat. Andrew started a couple of months before Greg and I did, and it looks like were progressing at a similar pace. Of course Andrew is a one-man show, and has a shorter season because hes in Canada, but it still helps keep the perspective.
Read More..

Sabtu, 19 November 2016

Drilling Small Holes


Drilling Small Holes
Originally uploaded by OzzyC.
Were overcoming our problem by drilling small holes where the epoxy bubbles are. We will then inject epoxy into the holes and weight down the area, so the fit is as tight as possible in the end.
Read More..

Rabu, 16 November 2016

Starting the Finish

Last night we began seeing light at the end of the tunnel. For two consecutive sessions, we have performed tasks other than the mind (and hand) numbing tasks of sanding and fairing. As I mentioned in my last post, we mounted the spray rails. Last night we rolled out a coat of pigmented epoxy.

Painting the hull with pigmented epoxy will serve two main purposes. One purpose is to get the hull a uniform color, which will make any remaining flaws more visible, and if the paint gets scratched, the pigmented epoxy will help hide the scratches. (Thats the second purpose.)

As you look at the pictures below, you will likely notice a couple of things...

- The area thats painted doesnt cover the entire bottom. This is because the painted area follows the approximate water line of the boat according to the plans. The area that hasnt been painted red will not be in the water.

-The spray rails do not follow the water line. We decided to have the spray rails follow the hull (from the top), not the water line.

-If you look really close, you may be able to see that the spray rails extend past the transoms. This is also intentional. It gave us room for error when mounting the rails to the boat; we will trim to the correct size and shape before we lay pigmented epoxy on the rest of the boat.

Read More..

Selasa, 15 November 2016

taping the inside seams

I hate working upside down, but this is what it seemed to dictate was the best procedure to keep the boat in alignment and true.  I mixed up small batches of WEST filleting powder (it is a milled fiber of some sort like cabosil)  and then added some thixotropic powder to it so it would hang in place without dripping.   Then I layered on 3" tape and brushed on epoxy.  The plastic cable ties used are far superior to the wires in that you can sand them and plane them in place. 

It took about 4 hours to do the seams in several shifts as I could only manage about 6 seams at a time before my back and patience gave out.  Only destroyed one old pair of pants in the process from the drips. 

The rest is gravy from here on out.  I plan to fill and fair the outer seams tomorrow evening and then will add layer of glass to the entire outside.  then it is sanding and installing the seats, oar locks, skeg. 

Would have taken photos, but did I mention how much I hate working upside down.  Maybe this weekend I can flip it and take some photos.  Would be nice to do the sanding outdoors.
Read More..
 
Boat Plans Book - Powered By Blogger